Authentication
You can verify a user with platform authenticator for MFA or passwordless signin.
- Windows: Fingerprint, Facial recognition or PIN (Windows Hello)
- Mac & iOS: Touch ID or Face ID
- Android: fingerprint, face or screen lock
Registration
Overview
This section will explain the flow of WebAuthn and Biometric authentication. Code is available in the examples section
Your backend calls the Authn.id api /register/authenticator endpoint with the username/id of the user.
Client-side initiates the WebAuthn process and is allowed to store the credential with the Authn.id API using the token.
Steps

1. Retrieve a registration token backend
const apiUrl = "https://api.authn.id/v1";
const API_SECRET = "demoproj:secret:KpkFr6Z6CjP8Dnek39kWFb7M.....";

const body = {
  userId: "1234567",
  username: "john@authn.id",
  displayName: "John Doe",
};

const response = await fetch(apiUrl + "/register/authenticator", {
  method: "POST",
  body: JSON.stringify(body),
  headers: {
    "x-authnid-api-secret": API_SECRET,
    "Content-Type": "application/json",
  },
});

const token = await response.text();

console.log(token); // eyJhbGciOiJIUzI1NiIsInR5cC...
2. Initiate the registration frontend
Get the client-side library from a cdn or npm. Pass the token to the authenticate in method to begin the registration process.
const authnId = new AuthnId.Client({
  apiKey: "demoproj:public:b75080483c3381e7d1a28e2e646abad2",
});

const response = await fetch("/your-backend/registerAuthenticator");
const token = await response.text(); // eyJhbGciOiJIUzI1NiIsInR5cC...

try {
  await authnId.registerAuthenticator(token);
  // Success!
} catch (e) {
  // Error
}
Authentication
Overview
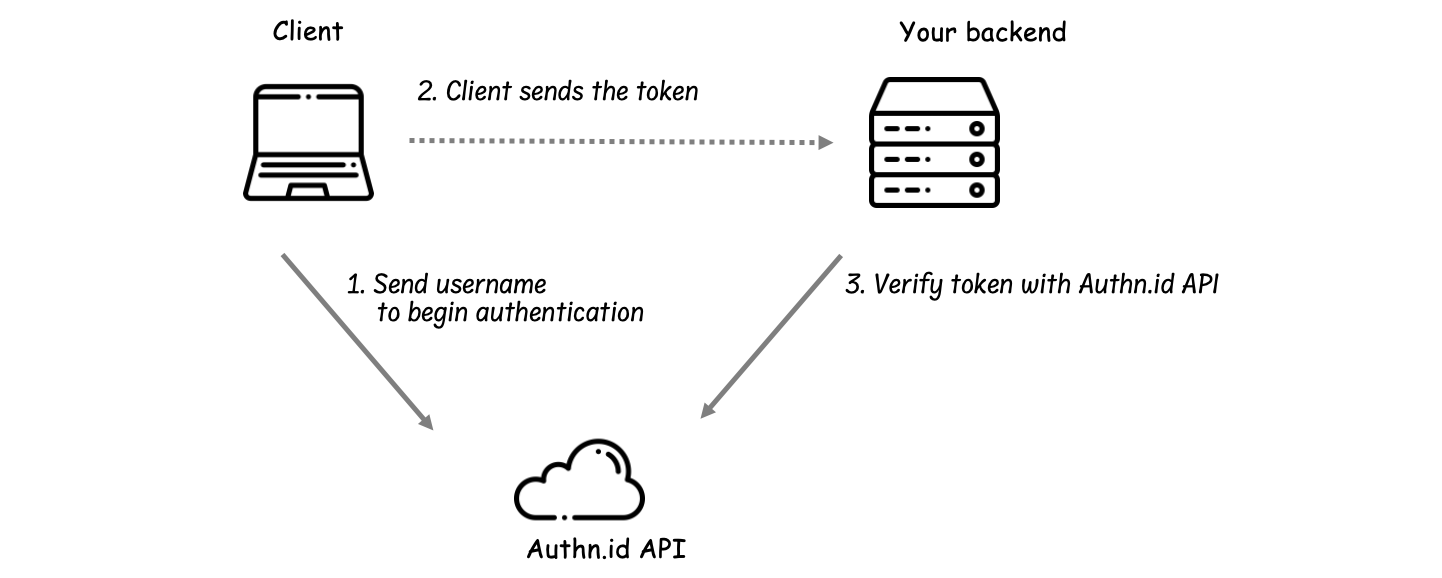
This section will explain the flow of this operation. Code is available in the examples section
Client-side library calls the Authn.id API with the username and initiates the WebAuthn process.
- If the sign-in is cryptographically successful, a token is returned from the Authn.id api to the client side.
- Client-side forwards the token your backend.
Your backend calls the Passworldess api /verify/token endpoint with the token.
- The Authn.id API verifies that the authentication was successful and returns the verified user and additional information about the authentication.
Steps
1. Start the authentication frontend
Get the client-side library from a cdn or npm. Pass the username to the authenticate in method to begin the authentication process.
const authnId = new AuthnId.Client({
  apiKey: "demoproj:public:b75080483c3381e7d1a28e2e646abad2",
});

const username = "john@authn.id";
// returns xyThbG9iOiJIUzI1NiIsInR5cCI6IkpXVCJZ...
const token = await authnId.authenticate(username);

// verifiy the token
const response = await fetch(`/your-backend/authenticate?token=${token}`);
const verified = await response.json();
if (verified.success) {
  // success!
}
2. Verify the token backend
Once the client-side code has finished the approval process you need to verify the token with the backend api. Only then can you trust that the verification process succeeded.
const apiUrl = "https://api.authn.id/v1";
const API_SECRET = "demoproj:secret:KpkFr6Z6CjP8Dnek39kWFb7M.....";

const { token } = req.query; // xyThbG9iOiJIUzI1NiIsInR5cCI6IkpXVCJZ...

const response = await fetch(apiUrl + "/verify/token", {
  method: "POST",
  body: token,
  headers: { "x-authnid-api-secret": API_SECRET, "Content-Type": "text/plain" },
});

var result = await response.json();
if (result.success) {
  // Success!
}
Response:
{
  "success":true,
  "userId":"1234567",
  "username":"john@authn.id",
  "displayName":"John Doe",
  "timestamp": "2023-01-01T00:00:00.000Z",
  "expiresAt": "2023-01-01T00:15:00.000Z",
}